Salesforce-MuleSoft-Developer-II Practice Test

Salesforce Spring 25 Release -
Updated On 18-Sep-2025

60 Questions

Refer to the exhibits.

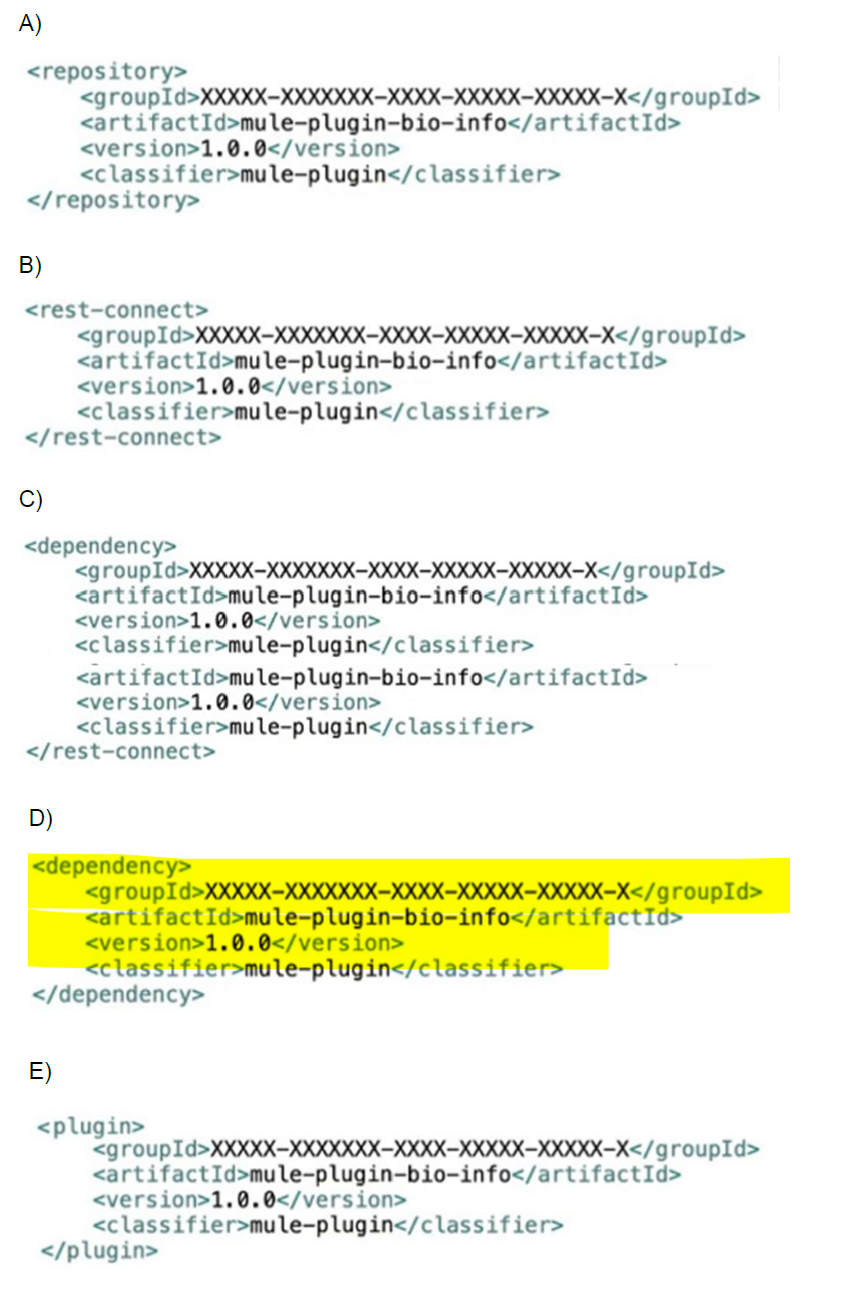
Bio info System API is implemented and published to Anypoint Exchange. A developer wants to invoke this API using its REST Connector. What should be added to the POM?

A. Option A

B. Option B

C. Option C

D. Option D

E. Option E

E.   Option E

Explanation:

To invoke the Bioinfo System API using its REST Connector in a Mule project, the developer needs to add a element in the POM file to include the REST Connector as a dependency. Option E shows a tag with the correct structure: , set to mule-plugin-bio-info, set to 1.0.0, and set to mule-plugin. This configuration ensures that the Mule plugin for the Bioinfo System API, published to Anypoint Exchange, is downloaded and integrated into the project during the Maven build process. MuleSoft’s documentation on creating and using custom connectors (Mule 4) specifies that a element is used in the POM to reference a Mule plugin (e.g., a REST Connector) from Anypoint Exchange, making option E the appropriate choice.

Incorrect Answers:

A. Option A
Option A shows a tag with , set to mule-plugin-bio-info, set to 1.0.0, and set to mule-plugin. A element defines a location to resolve artifacts but does not directly include the plugin as a dependency for the project. To use the REST Connector, the plugin must be added as a (not a ), so option A is incorrect. MuleSoft’s Maven guide clarifies that is for artifact resolution, while is for applying the connector.

B. Option B
Option B shows a tag with , set to mule-plugin-bio-info, set to 1.0.0, and set to mule-plugin. The tag is not a valid POM element in Maven or MuleSoft’s configuration. The correct element to include a Mule plugin (like a REST Connector) is , making option B incorrect. MuleSoft’s documentation on REST Connector integration emphasizes using the tag in the POM.

C. Option C
Option C shows a tag with , set to mule-plugin-bio-info, set to 1.0.0, and set to mule-plugin, followed by another and for rest-connect. A element is used for Java libraries, not Mule plugins or connectors, which require a element. Additionally, including rest-connect as a separate artifact is unnecessary and incorrect for invoking the Bioinfo System API’s REST Connector. MuleSoft’s POM configuration guide specifies that Mule plugins use rather than .

D. Option D
Option D shows a tag with , set to mule-plugin-bio-info, set to 1.0.0, and set to mule-plugin. While the artifact details are correct, using instead of is wrong. Mule plugins, including REST Connectors from Anypoint Exchange, must be declared as elements in the POM to be recognized and executed by the Mule runtime. MuleSoft’s documentation on Mule plugin development confirms that is the required tag for integrating custom or exchange-published plugins.

Additional Context:
The Bioinfo System API’s REST Connector, published to Anypoint Exchange, is a Mule plugin that provides pre-built operations to interact with the API. Adding it as a in the POM ensures that Anypoint Studio or Maven downloads the plugin and makes its operations available in the project’s palette or XML configuration. The value mule-plugin indicates the artifact is a Mule-specific plugin, which is standard for connectors.

Summary:
Option E is correct because the element in the POM is the proper way to include the Bioinfo System API’s REST Connector from Anypoint Exchange. Options A (), B (), C ( with extra artifact), and D ( alone) are incorrect because they use inappropriate or incomplete POM elements for integrating a Mule plugin.

References:

MuleSoft Documentation: Creating and Using Connectors – Specifies that Mule plugins, including REST Connectors, are added as elements in the POM.
MuleSoft Documentation: Maven in Anypoint Studio – Explains the use of for integrating Exchange-published artifacts and distinguishes it from and .
Apache Maven Documentation: POM Reference – Confirms that is used to apply plugins (like Mule connectors) during the build process.

Refer to the exhibit.

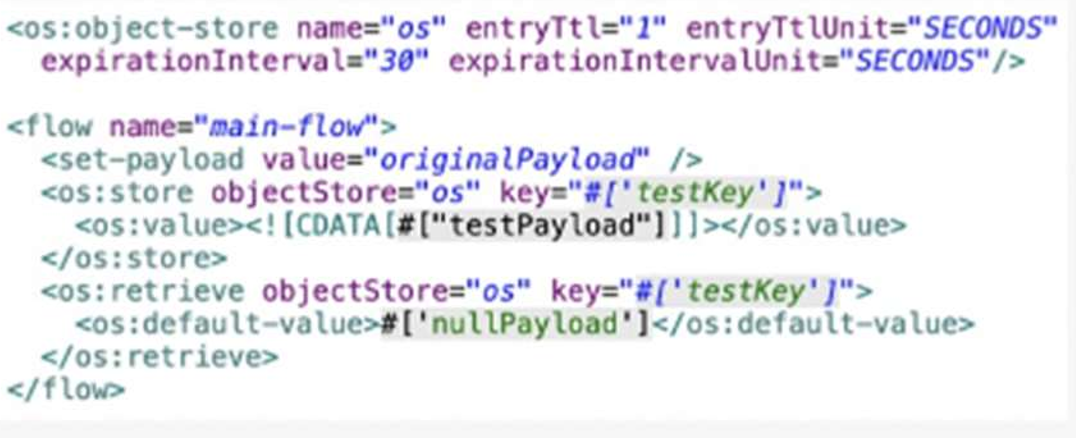
A Mute Object Store is configured with an entry TTL of one second and an expiration interval of 30 seconds.
What is the result of the flow if processing between os’store and os:retrieve takes 10 seconds?

A. nullPayload

B. originalPayload

C. OS:KEY_NOT_FOUND

D. testPayload

A.   nullPayload

Explanation:

In MuleSoft, the Object Store (os:store and os:retrieve) manages key-value pairs with a Time to Live (TTL) setting that determines how long an entry remains valid before expiration. Here, the os:object-store is configured with entryTtl="1" (1 second) and entryTtlUnit="SECONDS", meaning each stored entry expires after 1 second unless accessed or refreshed. The expirationInterval="30" and expirationIntervalUnit="SECONDS" define how often the Object Store checks for expired entries, set to every 30 seconds. When the flow executes, the os:store operation stores the payload (testPayload from #[CDATA[#['testPayload']]) under the key #[testKey] at time T0. If processing between os:store and os:retrieve takes 10 seconds, the retrieval occurs at T10. Since the TTL is 1 second, the entry expires 1 second after storage (at T1), well before the retrieval at T10. The os:retrieve operation returns the default-value (#[nullPayload]) when the key is no longer found due to expiration. MuleSoft’s documentation on Object Store (Mule 4) confirms that entries expire based on the entryTtl, and retrieval returns the default value if the entry is expired or missing.

❌ Incorrect Answers:

B. originalPayload
The originalPayload is set earlier in the flow with , but this value is not stored in the Object Store. The os:store operation stores testPayload, and the subsequent os:retrieve attempts to retrieve the value associated with #[testKey]. Since the stored value expires after 1 second, originalPayload is not returned. MuleSoft’s Object Store documentation specifies that retrieval returns the stored value only if it is still valid within the TTL.

C. OS:KEY_NOT_FOUND
The OS:KEY_NOT_FOUND error or value is not a default return from the os:retrieve operation. When a key is not found or has expired, os:retrieve returns the specified default-value (in this case, #[nullPayload]) rather than an error code like OS:KEY_NOT_FOUND, unless an error handler is configured to catch and handle such cases. MuleSoft’s documentation on Object Store operations notes that os:retrieve gracefully returns the default value for missing or expired keys.

D. testPayload
The testPayload is the value stored in the Object Store via os:store. However, because the TTL is 1 second and processing takes 10 seconds, the entry expires long before the os:retrieve operation occurs. Therefore, testPayload is not returned. MuleSoft’s Object Store configuration guide emphasizes that TTL enforcement causes entries to expire after the specified duration, affecting retrieval outcomes.

🧩 Additional Context:
The expirationInterval of 30 seconds determines how frequently the Object Store checks for expired entries, but it does not extend the TTL of individual entries. The TTL of 1 second is the critical factor here, as it governs when the testPayload entry becomes invalid. Since 10 seconds exceeds the 1-second TTL, the entry is expired by the time retrieval is attempted, resulting in the default nullPayload.

🧩 Summary:
Option A is correct because the Object Store entry expires after 1 second due to the entryTtl setting, and after 10 seconds of processing, os:retrieve returns the default-value of nullPayload. Options B (originalPayload), C (OS:KEY_NOT_FOUND), and D (testPayload) are incorrect because they do not reflect the expiration behavior or the default value returned by os:retrieve.

ℹ️ References:
MuleSoft Documentation: Object Store (Mule 4) – Describes how entryTtl defines the expiration time for stored entries and how os:retrieve returns the default value when a key is expired.
MuleSoft Documentation: Object Store Configuration – Explains the distinction between entryTtl (entry expiration) and expirationInterval (check frequency), with TTL taking precedence for individual entry validity.

An organization uses CloudHub to deploy all of its applications. How cana common-global-handler flow be configured so that it can be reused across all of the organization’s deployed applications?

A. Create a Mule plugin project
Create a common-global-error-handler flow inside the plugin project.
Use this plugin as a dependency in all Mute applications.
Import that configuration file in Mute applications.

B. Create a common-global-error-handler flow in all Mule Applications Refer to it flow-ref wherever needed.

C. Create a Mule Plugin project
Create a common-global-error-handler flow inside the plugin project.
Use this plugin as a dependency in all Mule applications

D. Create a Mule daman project.
Create a common-global-error-handler flow inside the domain project.
Use this domain project as a dependency.

C.   Create a Mule Plugin project
Create a common-global-error-handler flow inside the plugin project.
Use this plugin as a dependency in all Mule applications

Explanation:

To configure a common global error handler flow that can be reused across all of an organization’s Mule applications deployed on CloudHub, the best approach is:

✅ C. Create a Mule Plugin project. Create a common-global-error-handler flow inside the plugin project. Use this plugin as a dependency in all Mule applications.

Why a Mule Plugin project: A Mule Plugin project is designed to encapsulate reusable components, such as flows, configurations, or error handlers, that can be shared across multiple Mule applications. By creating a common global error handler flow in a Mule Plugin project, you can package it as a reusable artifact and include it as a dependency in all Mule applications. This promotes modularity, maintainability, and consistency across the organization’s applications.

How it works:
➜ Create a Mule Plugin project using Maven (with the mule-plugin classifier in the pom.xml).
➜ Define the common-global-error-handler flow within this project.
➜ Build and deploy the plugin to a repository (e.g., Anypoint Exchange or a Maven repository).
➜ Add the plugin as a dependency in the pom.xml of each Mule application.
➜ Reference the error handler in the Mule applications using the plugin’s configuration, ensuring consistent error handling across all applications.

Why CloudHub compatibility: CloudHub supports deploying Mule applications with dependencies on Mule Plugins. This approach works seamlessly in CloudHub as the plugin is resolved during deployment, and the error handler flow can be invoked as needed.

❌ Why not the other options?

A. Create a Mule plugin project, create a common-global-error-handler flow inside the plugin project, use this plugin as a dependency in all Mule applications, import that configuration file in Mule applications: This option is incorrect because Mule Plugins do not require importing a configuration file explicitly. Once the plugin is added as a dependency, its components (e.g., flows or error handlers) can be referenced directly in the Mule application without additional imports, making the “import configuration file” step unnecessary and misleading.

B. Create a common-global-error-handler flow in all Mule Applications, refer to it flow-ref wherever needed: This approach is inefficient and violates the principle of reusability. Creating the same error handler flow in every Mule application leads to code duplication, maintenance overhead, and potential inconsistencies across applications. It does not leverage a centralized, reusable component.

D. Create a Mule domain project, create a common-global-error-handler flow inside the domain project, use this domain project as a dependency: Mule Domain projects are used to share resources (e.g., connectors, configurations) across multiple Mule applications deployed on the same runtime instance (e.g., on-premises servers). However, CloudHub does not support Mule Domain projects, as each application runs in its own isolated runtime. Therefore, this approach is not applicable for CloudHub deployments.

Reference:
MuleSoft Documentation: Mule Plugin Development and Anypoint Exchange for Reusable Assets
MuleSoft Documentation: CloudHub Deployment Limitations

A company has been using CI/CD. Its developers use Maven to handle build and deployment activities. What is the correct sequence of activities that takes place during the Maven build and deployment?

A. Initialize, validate, compute, test, package, verify, install, deploy

B. Validate, initialize, compile, package, test, install, verify, verify, deploy

C. Validate, initialize, compile, test package, verify, install, deploy

D. Validation, initialize, compile, test, package, install verify, deploy

C.   Validate, initialize, compile, test package, verify, install, deploy

Explanation:

Maven follows a well-defined build lifecycle consisting of phases executed in a specific order. The phases listed in the question correspond to key stages in the default lifecycle of Maven. Below is the correct sequence and brief description of each phase:

➝ Validate: Checks if the project is correct and all necessary information is available.
➝ Initialize: Sets up the build process, such as initializing properties or creating directories.
➝ Compile: Compiles the source code of the project.
➝ Test: Runs unit tests using a suitable testing framework (e.g., JUnit). Tests are executed in a separate classpath to avoid interference with the main build.
➝ Package: Takes the compiled code and packages it into its distributable format (e.g., JAR, WAR).
➝ Verify: Runs checks on the results of integration tests to ensure quality criteria are met.
➝ Install: Installs the packaged artifact into the local repository for use by other projects.
➝ Deploy: Copies the final package to a remote repository for sharing with other developers or deployment to production.

❌ Why not the other options?

A. Initialize, validate, compute, test, package, verify, install, deploy: Incorrect because "initialize" comes after "validate," and "compute" is not a valid Maven phase (likely a typo for "compile"). The order is also wrong.

B. Validate, initialize, compile, package, test, install, verify, verify, deploy: Incorrect because "test" should come before "package," and "verify" is listed twice, which is redundant and incorrect.

D. Validation, initialize, compile, test, package, install, verify, deploy: Incorrect because "validation" is not the correct term; the phase is called "validate." Additionally, the sequence has a minor terminology error, making C the more precise choice.

🧩 Reference:
Apache Maven Documentation: Introduction to the Build Lifecycle

A mule application exposes and API forcreating payments. An Operations team wants to ensure that the Payment API is up and running at all times in production. Which approach should be used to test that the payment API is working in production?

A. Create a health check endpoint that listens ona separate port and uses a separate HTTP Listener configuration from the API

B. Configure the application to send health data to an external system

C. Create a health check endpoint that reuses the same port number and HTTP Listener configuration as the API itself

D. Monitor the Payment API directly sending real customer payment data

A.   Create a health check endpoint that listens ona separate port and uses a separate HTTP Listener configuration from the API

Explanation:

To ensure the Payment API is up and running in production, the best approach is:

✅ A. Create a health check endpoint that listens on a separate port and uses a separate HTTP Listener configuration from the API.
Why a health check endpoint: A health check endpoint is a standard practice to monitor the availability and operational status of an API without impacting its core functionality. It provides a lightweight way to verify the API's health (e.g., connectivity, dependencies, and runtime status) without processing sensitive or real data.

Why a separate port and HTTP Listener: Using a separate port and HTTP Listener configuration for the health check endpoint isolates it from the main API traffic. This reduces the risk of interference with production traffic, enhances security by limiting exposure, and allows independent scaling or monitoring of the health check. It also ensures the health check is not affected by issues like API throttling or authentication requirements.

❌ Why not the other options:

B. Configure the application to send health data to an external system: While sending health data to an external system (e.g., monitoring tools like Splunk or New Relic) is useful for observability, it does not directly provide a way for the Operations team to actively check the API's availability in real-time. It’s a passive approach and may require additional setup or dependencies.

C. Create a health check endpoint that reuses the same port number and HTTP Listener configuration as the API itself: Reusing the same port and HTTP Listener mixes health check traffic with production API traffic, which can lead to performance impacts, security risks (e.g., exposing health check details to clients), or complications with authentication and routing. It’s less reliable for isolated monitoring.

D. Monitor the Payment API directly sending real customer payment data: Using real customer payment data for monitoring is highly risky, unethical, and likely violates compliance regulations (e.g., PCI DSS for payment systems). It could also lead to unintended side effects, such as duplicate transactions or data exposure.

ℹ️ Reference:
MuleSoft Documentation: Monitoring Applications and HTTP Listener Configuration

Page 1 out of 12 Pages